
Snapchat filters have become a fun and creative way to make photos and videos more exciting. They allow you to express yourself, celebrate special moments, or promote your brand in a unique way. Whether it’s a birthday, a wedding, a local event, or even your small business, a custom Snapchat filter can make your snaps stand out and connect with people instantly. The best part is that you don’t need to spend money to make one. Snapchat offers free tools that help anyone design and publish their own filter without needing design or coding skills.
In this guide, you’ll learn exactly how to create your own Snapchat filter for free. From understanding what filters are to designing and publishing one that everyone can use, every step will be covered in detail. By the end, you’ll be ready to create your first filter that people will love using.
What Is a Snapchat Filter and Why It Matters
Snapchat filters are creative overlays that appear on your snaps after you take a photo or video. When you swipe left or right on Snapchat’s camera screen, you’ll see different filters that can change the color, add frames, display text, or even create animated effects. Some filters show your current location or time, while others are tied to events or special holidays.
Filters are more than just decorations — they help you tell a story. For example, if you’re attending a wedding, you can design a beautiful filter with the couple’s names and the wedding date. If you’re promoting a new product, your filter can include your brand logo and a simple slogan.
There are two main types of filters you can create: Community Filters and Lenses.
A Community Filter is a static design tied to a location or event. It doesn’t move or react but serves as a stylish overlay that anyone in that area can use. Think of it like a themed frame that appears when people take snaps in a certain place — for instance, a park, a school, or a festival.
A Lens, on the other hand, uses augmented reality (AR) to make the experience interactive. It can move, react, or change when someone smiles or moves their head. Lenses are a bit more advanced, but Snapchat’s free Lens Studio app makes it simple to create them even if you’re a beginner.
How to Create a Community Filter for Free

A Community Filter is the easiest and most popular option for people who want a simple, free Snapchat filter. You don’t need expensive software or advanced skills. Everything can be done online through Snapchat’s official filter creation tool.
Let’s go step by step.
Step 1: Visit Snapchat’s Filter Creation Page
Go to create.snapchat.com and sign in with your Snapchat account. Once you’re logged in, click on Community Filters from the menu and choose Geofilter. This will open the design and upload section.
This official site is completely free and safe. You can use it to design, preview, and submit your filters directly to Snapchat.
Step 2: Design Your Filter
Now comes the fun part — designing your filter. You can either use Snapchat’s ready-made templates or upload your own design. If you’re designing from scratch, make sure your file is 1080 pixels wide and 2340 pixels tall with a transparent background. The file format should be .PNG to maintain quality.
If you don’t have professional design software like Photoshop, use free tools such as Canva, Pixlr, or Figma. These websites are beginner-friendly and offer pre-sized templates for Snapchat filters.
When designing, keep these tips in mind:
- Leave the center of the image clear so the main subject remains visible.
- Don’t use more than 25% of the screen area for design elements.
- Avoid putting too much text or logos.
- Stick to bright, readable colors and simple shapes.
For example, if you’re creating a wedding filter, add decorative borders, elegant fonts, and soft colors. For a birthday, you might use balloons, confetti, or colorful ribbons.
Remember, Snapchat only accepts filters that are original and appropriate. Don’t include photos of people, brand logos (unless it’s your own), or copyrighted designs.
Step 3: Choose the Location (Geofence)
After uploading your design, Snapchat will ask you to select a location for your filter. This is called a geofence — a virtual boundary that determines where your filter can be used.
A map will appear on your screen. Use your mouse to draw a shape around the area where you want your filter to be active. For example, if you’re creating a filter for a friend’s wedding, draw the boundary around the wedding venue. If it’s for your school or local park, cover that area only.
The smaller and more specific your geofence, the better. It makes your filter easier to find and keeps it relevant to the location.
Step 4: Submit for Review
Once you’re satisfied with your design and location, click Submit. Snapchat will review your filter to make sure it follows their rules. The review process usually takes a few hours, but it can take up to one day. You’ll receive an email once it’s approved.
After approval, your filter goes live, and anyone using Snapchat within your chosen area will be able to use it instantly. This process is completely free, and you can create as many community filters as you want.
How to Create a Lens Using Lens Studio
If you want your Snapchat filter to move, react, or include animations, then you should use Lens Studio. This free desktop app allows you to create 3D effects, facial animations, and augmented reality experiences without needing to code.
Step 1: Download Lens Studio
Go to lensstudio.snapchat.com and download the app for free. It’s available for both Windows and Mac. Once installed, open the app and sign in with your Snapchat account.
Step 2: Choose a Template
When you open Lens Studio, you’ll see dozens of templates made for beginners and professionals. These templates give you a head start so you don’t have to build everything from scratch.
Some useful templates include:
- Face Mask – Add face effects like glasses or crowns.
- 2D Animation – Overlay animated graphics on your snaps.
- 3D Object – Place virtual objects like balloons or gifts in the camera view.
- Background Replacement – Replace your background with an image or animation.
Choose a template that matches the type of effect you want to create.
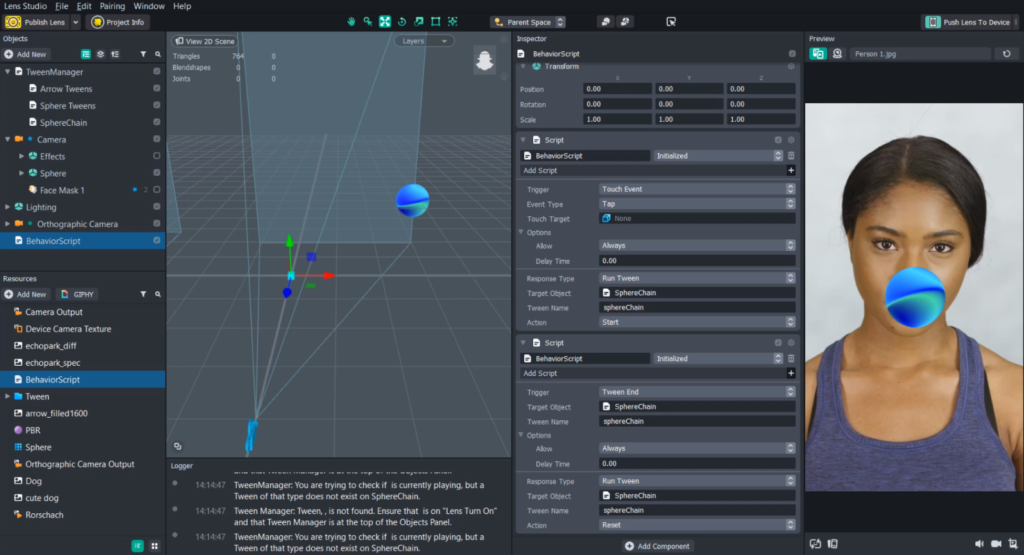
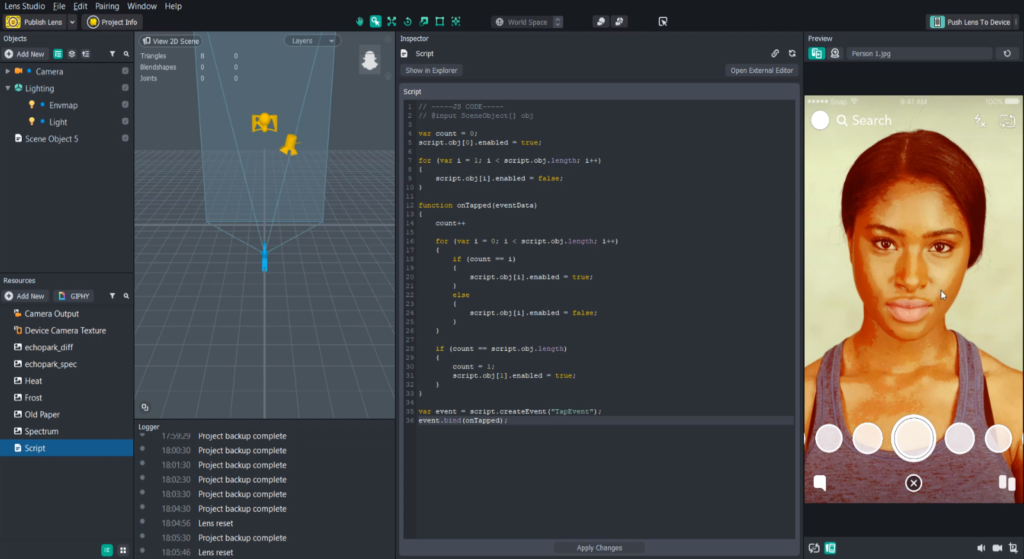
Step 3: Customize Your Lens
Once you’ve picked a template, you can customize it with your own photos, colors, or text. You can import 2D and 3D assets, adjust motion, and control how the lens reacts when people interact with it.
For instance, you can make confetti appear when someone smiles or have a floating banner show up when they blink. You don’t need to know coding — most templates already include interaction settings. You just select what happens when a certain action occurs.
Step 4: Test and Preview
Before you publish, test your lens to make sure everything looks right. In Lens Studio, click Preview on Device. You’ll get a unique Snapcode that you can scan using your Snapchat camera to try your lens in real time.
If something doesn’t work or looks off, go back to Lens Studio, fix it, and test again. Keep repeating until you’re happy with the final version.
Step 5: Submit Your Lens
When your design is ready, click Submit Lens. Fill out the required information such as lens name, category, and tags. Then upload it for review. Once Snapchat approves your lens, it becomes available to everyone through a Snapcode that you can share on social media, websites, or events.
Creating a lens is more advanced than a community filter, but it allows for endless creativity. It’s perfect for special campaigns, events, or personal projects — and it’s still 100% free.
Tips for Creating an Effective Snapchat Filter
Designing a Snapchat filter that people actually use takes creativity and balance. Here are some tips that help your design stand out and get approved quickly.
1. Keep It Simple: Overly busy designs can distract from the main photo. A clean, balanced layout works best.
2. Match the Mood: Choose colors and styles that fit the theme of your event. For example, soft pastels for weddings, bright tones for birthdays, and minimal designs for business events.
3. Use Clear Fonts: Avoid fancy or hard-to-read fonts. Make sure any text is visible even on light or dark backgrounds.
4. Leave Space: Always leave enough space in the center so people’s faces or main subjects aren’t covered.
5. Test Before You Submit: Try your filter on multiple photos with different lighting conditions to see how it looks.
6. Follow Snapchat’s Rules: Avoid copyrighted material or offensive content. Snapchat only approves original and family-friendly designs.
Following these tips ensures your filter gets approved faster and used more often.
Why You Should Create Your Own Filter
Creating your own Snapchat filter is not just about fun — it’s also about connection and creativity. For personal users, filters add a personal touch to special moments like weddings, birthdays, or holidays. Seeing friends and family use your design on their snaps feels special and memorable.
For businesses, filters can act as free local advertising. When people use your filter, they automatically promote your brand to everyone who views their snaps. It’s a simple way to increase brand awareness without spending money on ads.
Schools, community centers, and local events can also use filters to bring people together. A custom design can create a sense of identity and make everyone feel part of the moment.
Final Thoughts
Making a Snapchat filter for free is easier than ever. You don’t need to be a designer or tech expert — just have a creative idea and follow a few simple steps. Whether you’re making a community filter through Snapchat’s website or an interactive lens with Lens Studio, both options are completely free and beginner-friendly.
Start with something simple, like a filter for your school, birthday, or neighborhood. As you get comfortable, experiment with AR effects and animations. Soon, you’ll be creating professional-looking filters that people will love to use.
Snapchat filters are more than just visuals — they’re a form of expression that lets you share your creativity with the world. And when you see people enjoying and sharing your work, it’s one of the most rewarding feelings. So go ahead, open your laptop, and start designing your free Snapchat filter today — your creativity might just light up someone’s next snap.